What's the dimension of anti-glare sheet?
Anti-glare sheet for all current models: 210*148.5㎜
Thank you for your feedback
Was this article helpful?
How Do I Connect an External Microphone?
Plug a 3.5mm mono microphone to

port. The built-in microphone on the control panel will be disabled when an external microphone is connected. The recorded audio will be in monophonic sound.

Thank you for your feedback
Was this article helpful?
How do I record a video using the on-board recording button?
- Insert a USB flash drive into the USB memory slot. USB dip Switch should be moved towards the USB symbol. Now simply press the ''Recording'' button on your unit's control panel. To stop the recording, press the ''Recording'' button again. The video will save in .AVI format in your USB flash drive. F50HD can support USB flash drive from 2GB to 64 GB.
- Insert a SD card into the SD card memory slot. From your document camera's Menu, select Setting tab > Current Storage > SD memory card > enter. Now simply press the ''Recording'' button on your unit's control panel. To stop the recording, press the ''Recording'' button again. The video will save in .AVI format in your SD card. F50HD can support SD card from 1GB to 32GB.
Thank you for your feedback
Was this article helpful?
Visualizer can't detect the inserted USB flash drive? (for F30/F50/F50HD/F33/F55)
Make sure the USB flash drive switch is set to

and check if the USB flash drive is properly inserted.
Thank you for your feedback
Was this article helpful?
Looking at the user manual I see that there is a RS-232/CVBS port on the visualizer, what is this? (for F30/F50/F50HD/F55)
This port splits to two connections using the RS232/CVBS splitter cable that comes within your package content. It converts the port into a RS-232 connection and also a composite video connection.
Thank you for your feedback
Was this article helpful?
Is there a light source on the visualizer?
It has a built in LED light attached to the camera head that provides light to your presentation when needed.
Thank you for your feedback
Was this article helpful?
Does the visualizer have an adjustable neck?
It has a gooseneck that allows you to lean, bend, and flex the camera in any direction.
Thank you for your feedback
Was this article helpful?
Does the visualizer have a microphone?
Yes, it has a built-in mic that makes it ideal for recording lesson plans and presentations.
Thank you for your feedback
Was this article helpful?
Is it possible to use the visualizer without a computer?
Yes, it can connect to a projector or LCD screen using the video outputs.
Thank you for your feedback
Was this article helpful?
Can I connect the visualizer to my computer?
Yes, it can connect to both PC and Mac with a USB Cable.
Thank you for your feedback
Was this article helpful?
How can I check the Firmware version with Sphere2?
Thank you for your feedback
Was this article helpful?
How Do I Transfer Captured Images/Videos to a computer?
- This enables you to transfer the captured image from the built-in memory or SD to a computer.
The instruction below MUST be read and followed BEFORE connecting the USB cable.
- Make sure to set the USB switch to
 for the computer to detect AVerVision F50HD.
- MUST set the USB to PC as STORAGE before connecting the USB cable.

- When ''Mass Storage Start…'' appears at the lower right corner of the presentation screen, you may now connect the USB cable.
- Upon connecting the USB cable, the system automatically detects the new removable disk. You can now transfer the captured image(s) from the F50HD built-in memory to the computer hard disk.
Thank you for your feedback
Was this article helpful?
How Do I Connect to a Microscope?
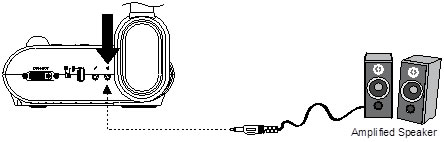
How Do I Connect an Amplified Speaker?
Plug a 3.5mm plug amplified speaker to

port. Only the audio from the video playback is supported.
We recommend connecting an amplified speaker to the Audio output port. Take caution when using earphones. Adjust the volume down on the remote to prevent hearing damage due to loudness.
Thank you for your feedback
Was this article helpful?
The presentation screen does not show the exact desktop image on my PC or Notebook after I toggle from Camera to PC mode.
-
Return to your PC or Notebook, place the mouse on the desktop and right click, choose ''Properties'', choose ''Setting'' tab, click on ''2'' monitor and check the box ''Extend my Windows desktop onto this monitor''.
-
Then go back one more time to your PC or Notebook and place the mouse on the desktop and right click again.
-
This time choose ''Graphics Options'', then ''Output To'', then ''Intel® Dual Display Clone'', and then choose ''Monitor + Notebook''.
-
After you follow these steps, you should be able to see the same desktop image on your PC or Notebook as well as on the presentation screen.
Thank you for your feedback
Was this article helpful?
There is no computer signal on presentation screen.
-
Check all the cable connections among the display device, AVerVision Visualizer and your PC.
-
Connect your PC to the AVerVision Visualizer first before you power on your computer.
-
For notebook, repeatedly press FN+F5 to toggles between display modes and display the computer image on the presentation screen. For different command, please refer to your laptop manual.
Thank you for your feedback
Was this article helpful?
There is no Camera image on the presentation screen.
-
Check all connections again as shown in the user manual.
-
Verify the setting of the display output device make sure it is set to the correct input channel.
-
The unit's power light turns Orange in standby mode. Press the POWER button again to turn it ON and the LED Power light will turn Blue.
-
The default camera display resolution setting is on 1024X768. If your output device does not support this resolution no image can be projected.
-
Check the TV/RGB switch on the side of the camera and set it accordingly to the type of display device you have.
-
Check all cables are good among the display device, AVerVision Document Camera and your PC, replace cables if necessary.
Thank you for your feedback
Was this article helpful?
How do I turn off the on-screen display of the AVer logo?
To turn off the AVer logo display, press and hold the Left and Menu button for 3 seconds. Repeat this step to re-enable the logo display.
Thank you for your feedback
Was this article helpful?
The picture on the presentation screen is distorted or the image is blurry.
-
Reset all changed settings, if any, to the original manufacturer default setting. Press MENU then go to SYSTEM > Default and select YES in the OSD menu.
-
Use the Brightness and Contrast menu functions to reduce the distortion if applicable.
-
If you discover that the image is blurry or out of focus, press the Auto Focus button on the control panel or remote control.
Thank you for your feedback
Was this article helpful?
The brightness on the presentation screen is dark and unreadable
-
Turn on Auto Image in your unit's Menu (Menu > IMAGE > Advanced > Auto Image)
-
Reset your document camera to default by pressing Menu > System > Default > Yes > Enter.
-
Make sure there are sufficient lighting in the room or Turn on the LED lamp on your document camera head.
-
Manually adjusts the Brightness and Contrast levels in the Camera's Menu.
-
Your projector's bulb may need to be changed.
Thank you for your feedback
Was this article helpful?
Can you record video with audio with the visualizer?
Yes, you can record video with audio using the on-board recording or through the software provided.
Thank you for your feedback
Was this article helpful?
AVer products not impacted by Log4j CVE-2021-44228 and related vulnerabilities.
In response to the reported vulnerability CVE-2021-44228 in the Apache Log4j2 Java library, AVer is conducting a thorough review of our software to determine any potential impact on our services to our customers.
The following AVer products and applications are not susceptible to the Log4j 2.x CVE-2021-44228 vulnerability.
AVerTouch
CaptureShare
Control Box applications
Interactive Flat Panel applications
OBS Plugin
Professional PTZ Cameras
PTZ Control Panel
PTZ Link
PTZ Management
Sphere 2
Sphere Lite
This list is not final. We will continue to monitor the situation.
Thank you for your feedback
Was this article helpful?
Does Sphere2 support linux?
No, supports Windows® and Mac® only.
Thank you for your feedback
Was this article helpful?
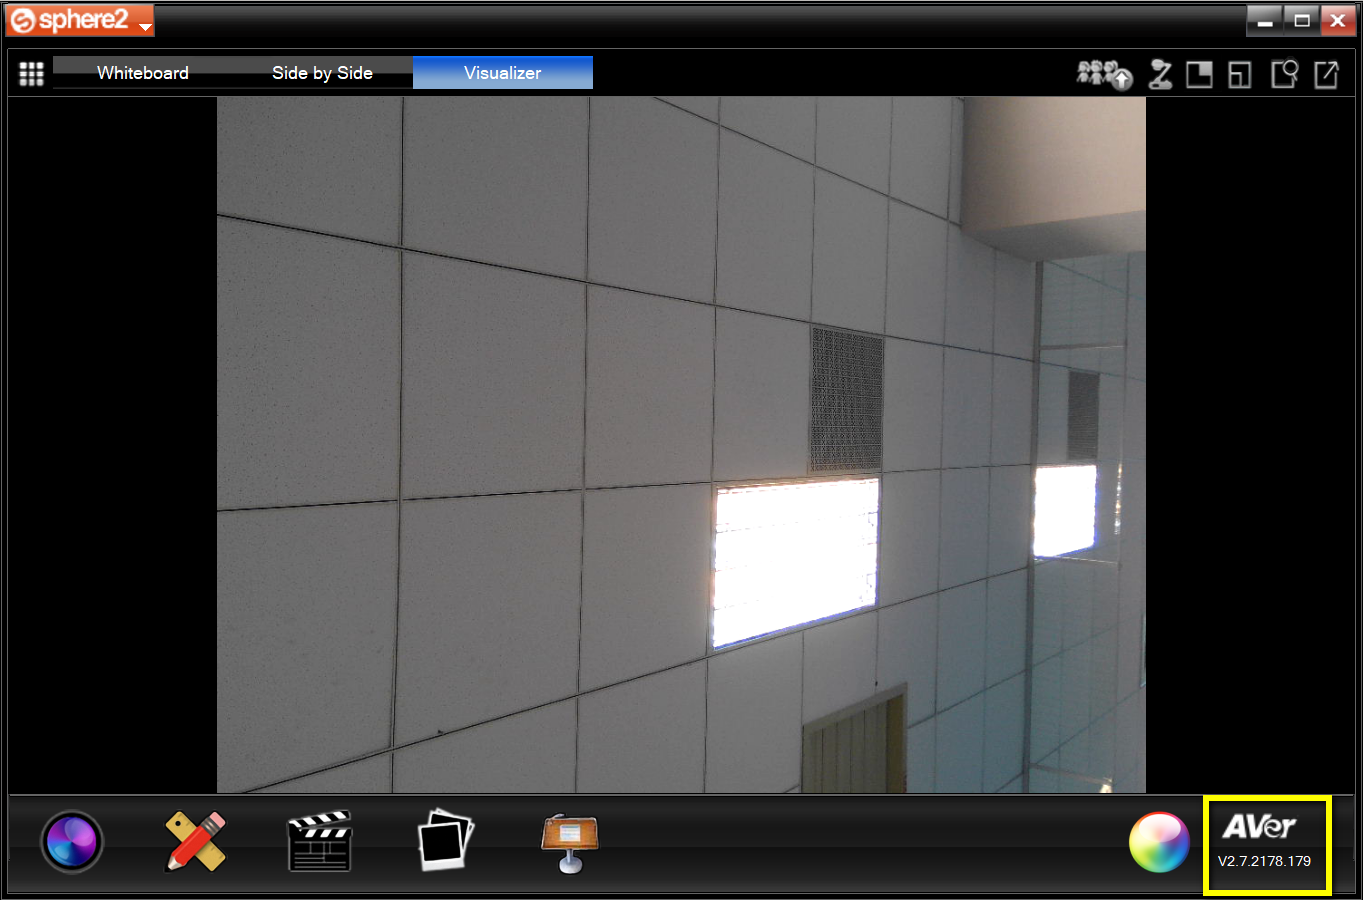
How can I check the software version of sphere2?
Please see the bottom-right corner.
Thank you for your feedback
Was this article helpful?
Where can I find the visualizer driver for the AVerVision F30?
Please refer to the link as below.
Please note that the AVerVision F30 supports Window XP & Mac OS up to 10.7.
Thank you for your feedback
Was this article helpful?
Where is the folder on Sphere2 software? I can't find the photos and videos.
It has two ways that you can find the folder on Sphere2.
1. You can click the ''Folder'' button quickly. Please see the circle on the picture.
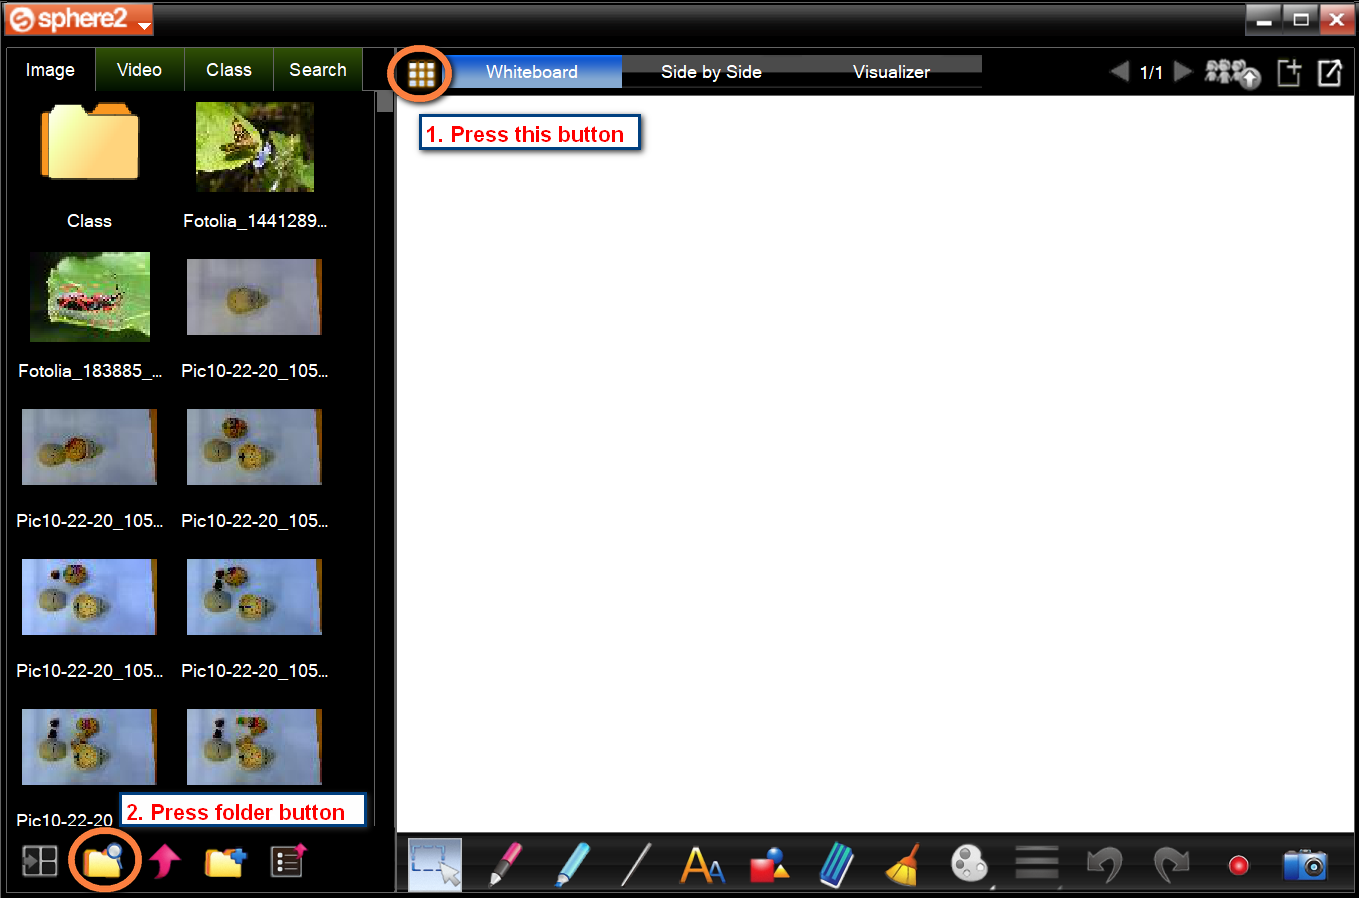
2. Find the '' C:\Documents\AVer\Media Library '' you will see the ''Picture'' and ''Video'' folder.
Thank you for your feedback
Was this article helpful?
The AVerVision Software cannot detect the document camera.
-
Make sure your USB cable is connected.
-
Make sure the USB cable or computer USB port is not defective.
-
Move the USB switch on the document camera away from the USB symbol.
-
Check your Device Manager, If Digital presenter driver shows damaged, right click and select ''Update Driver''.
-
Make sure you have the most currently updated software, download list is found under Download tab.
Thank you for your feedback
Was this article helpful?
Is the visualizer compatible with Interactive whiteboards software?
Yes, with the AVerVision Flash Plug-in downloadable from AVer's website.
Thank you for your feedback
Was this article helpful?
Can this product support flip teaching (flipped classroom) where students learn new contents online by watching video lectures at home and apply what they learn in the classroom?
Yes! Through the free AVer software, you can present, annotate, record, and stream lesson plans through sites such as YouTube™, Dropbox™, etc.
Thank you for your feedback
Was this article helpful?